
I thought some of you would enjoy a quick tutorial on how to make those little paper flowers I used as part of my table setting a couple weeks ago. The credit for these go to Martha Stewart (I saw this idea nearly 10 years ago in her magazine, but haven't been able to find it on her website). So here I go..
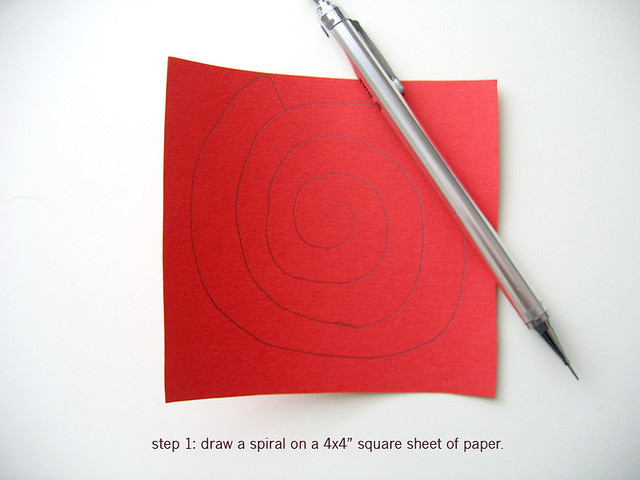
Step 1: Draw a spiral on a 4x4" square sheet of paper
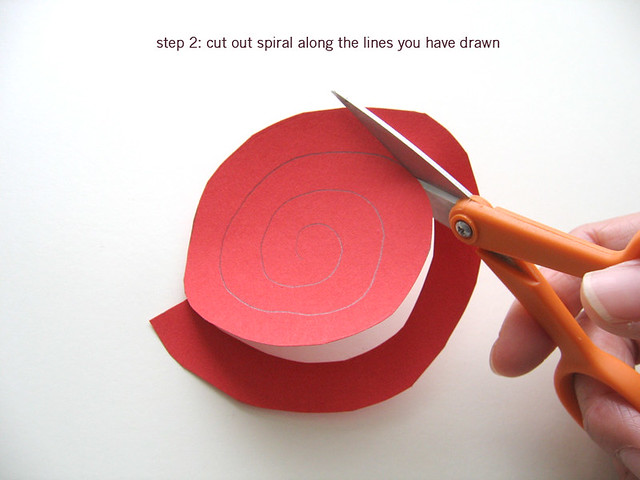
Step 2: Cut out spiral along lines you have drawn
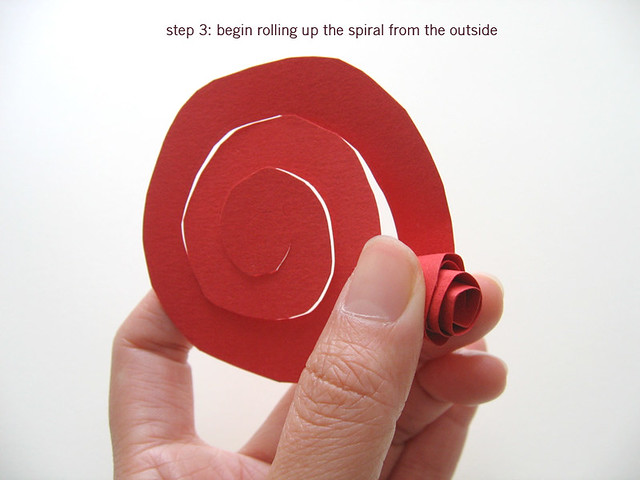
Step 3: Begin rolling up the spiral from the outside
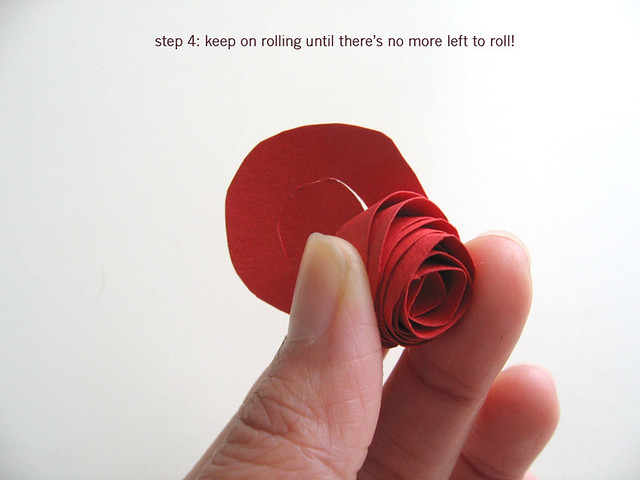
Step 4: Keep on rolling until there's no more left to roll
Step 5: You're done!
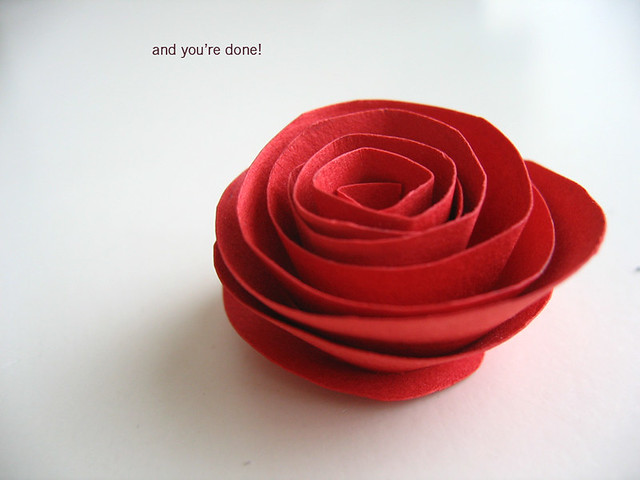
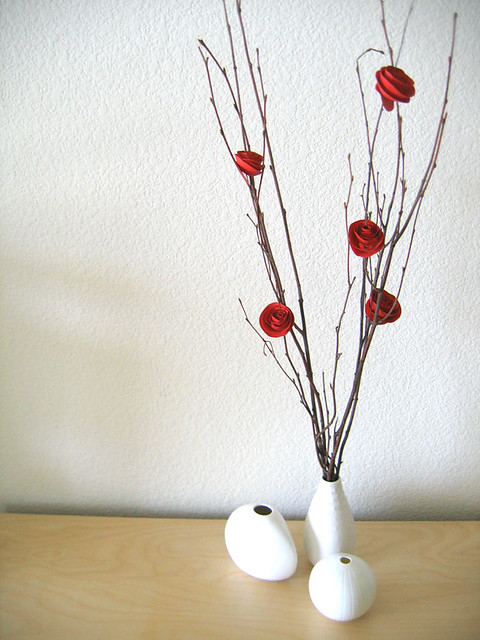
I used a slightly heavier weight paper for this one, but you can use normal paper as well. You can use squares of various sizes to have different sized flowers. Besides sticking them on branches, they would be great scattered on the table as well. Heck, you can even make a little bouquet of them. Have fun!
Note: You may use a bit of glue or double-stick tape to keep the flower from unrolling and loosening up with time. I didn't glue the ends for these specific flowers and they held up alright.
May 31, 2008
Paper flower tutorial
Subscribe to:
Post Comments (Atom)

209 comments:
1 – 200 of 209 Newer› Newest»wendy,
thank you for this - i've been thinking about making a bunch of these for my brother's wedding reception this july {it is totally casual, but these will make it feel special} - one question: do you glue or tape or tuck the end in? how do you keep it from unrolling?
THANK YOU!
tia
Hi Tia! I don't use tape or glue to affix the end, but it probably is a good idea to do it. They can unroll on the branches, but not too much, so I just kept them as is. I think Martha Stewart did say to glue the end though. Good luck with the reception decor! Sounds fun :)
Wow, thanks for this, i was just thinking "how did she make those nice paper flowers".
That is so much fun,Thanks. I'll be giving this one a whirl. Your blog is everything I love in blogs, lots of beautiful photos, ideas and lovely patterns. I found you through hollabee, yay!
Wendy! Thank you, thank you for posting this! I was waiting for it! I'm going to try it out right now!!
p.s.-one of your notebooks is on the home page of Etsy...just a little FYI!
You're welcome J! I hope you have fun with the flowers. And oh my, thanks so much for letting me know I got on the front page 'cause I was seriously sitting there wondering why my views were going up so fast! So exciting! Thanks! :)
simple but brilliant. this is why i love anything Martha Stewart-ish. =)
hope you had a great weekend!
gorgeous!
You make a very simple idea look beautifully styled and very refined.
this is too awesome. love everything. =]
oh, how I love those roses!
So beautiful!
Melissa
Um...you're my hero. :)
Gorgeous! I love how simple but elegant the roses are. And oh so easy!
I have added this to my paper flowers blog, makingpaperflowers.blogspot.com, I hope you don't mind. I gave you credit.
Thanks for the inspiration!
Wow, what a lovely center piece - thank you for the tutorial...can't wait to try it. I really enjoy your blog - so lovely!
How sweet! A nice thing to scatter on plates for a dinner party decoration.
I just discovered your blog via Shimmy Shake's, and I love all the pictures you take and crafts you make. It's so cool that I live very close to you!(san jose) Thanks so much for all the work!
what a great tutorial! i'm starting to plan my wedding, and i love the idea of using these in place of some of the real flowers-- SO CUTE!!
I love this! It's such a brilliant idea. Thanks for the tutorial :)
Hola :)
Great idea!! Thanks!!
^_^
wow.. great one. simple to make. i made few of them. Will share the photos :)
I'm so glad you all enjoyed the tutorial! And yes, would love to see photos of the ones you make :)
Good Job! :)
Oh that looks so easy!
Thanks for the instructions!
very sweet creation
I hope u don't mind for me to feature this beautiful creation in my blog. Kudos for u~
=)
I Wendy,
I'm from Portugal and today while I was researching on the internet the subject «paper flower» I found out your blog...that was a very nice surprise to me!I loved this flowers, they seem so simple but at the same time so beautifil...Congratulations!
Wow! Sooo cute! TFS! :D
This is absolutely gorgeous! So cute!
Hello! I just stumbled across your blog from Celestina Carmen blog. I have to say I love the simplicity and organic nature of your designs. Really beautiful. And I just might have to try my hand at some of these paper flowers!
Hi Wendy,
I just cant take my eyes out of this beautiful creation.. i'll try this for sure.. Hoping to see more such creation..
These are just gorgeous Thanks for the tutorial
Hi Wendy,
Thanks for your comment. I tried out this flower tutorial and i am very happy as it came out quite good.
http://reshmi-on-art.blogspot.com/2008/08/waste-branches-rose-on-branches.html
Thanks to you :)
I found this via a link at Studio Calico and LOVE this idea! Can't wait to give it a try at home tonight! TFS!
This is what I have been searching for!
Woo!
You made my day : j
Awesome, I just made them and they turned out beautiful - Rekha
so simple but so nice! Thanks for the great toutorial. Doreen
Very easy to do and yet the effect is really good. Thanks for sharing
Thanks for the tutorial. I just sent it to my husband in hopes that I might get flowers eventually. LOL!
i hav made these b4 they are so kl to make but u need some patance and some time :)
I tried making these and they came out great. At first I was having some trouble because I thought I was supposed to set the look of the flower as I wound it up but then I tried just winding it somewhat tightly and then letting go at the end and that worked really well - the paper 'naturally fell' into place.
Just for fun I tried it again without rounding the edges of the spirals and with the square corners pointed upwards it gave it a really neat shape.
I'm also thinking about trying this out with fabric.
Just stumbled across your blog and I love these little paper roses. Any plans for additional tutorials?
Wow! Love them. I think my DD will love them too. Can't wait to show her and make a bunch.
Hi there - love your stuff! I just wanted to let you know that I featured your blog on my blog with a link to this rose tutorial. thanks so much for the inspiration!
Papercrafting Blog Carnival
Thanks for posting this! I followed your tutorial (and linked back to you on my blog), but I have to say, your flowers are much prettier than mine!
Thank you soo much for the post.
The idea and the result are both great! I just wanted to let you know that I linked it to my blog, I hope it's ok for you
For the moment I've not yet made the paper flowers but your tutorial was an inspiration for a crafet flower :)
Tks
Simple and beautiful: thank you!
Greetings from Buenos Aires, Argentina
Hi Wendy,
it is said that “Imitation is the greatest form of flattery” and today I am Imitating Wendy Chung’s Tutorial: Paper Flower Table Setting of Dozi Design but I used felt !
Please come and visit Craft Gossip Felting and do leave a comment.
http://felting.craftgossip.com/2008/12/16/tutorial-of-felt-roses-on-branches-and-a-tiny-tree/
Regards,
Linda (Felting Editor)
It's just paper, you use your hands...it's simple, stylé and so good looking.
Thanks so much for this tips !
Cheers
Slim
I love how simple these are to make. great idea! thanks!!
Thank you so much for this tutorial! This is so beautiful!
It's lovely things.I really like this..
Awesome tutorial, these are so simple and easy, yet they look beautiful and delicate! I love it.
Oh my goodness, I think you just changed my life! Well, at least my wedding planning :) Thanks a ton!!
simply awesome... looks more cuter than a real rose...
I've refreshed a ton of times and only the top two pics show up. :( I wanna cry!
Oh my gosh those are gorgeous and so completely easy. I wish I thought of them.
Wow! This looks so gorgeous. Thank you so much for the tutorial!
Asha
i love this! i used fabric instead. worked beautifully!
Hi!
I absolutely love this idea and have had this page bookmarked for a while now.
Quick question though. They look amazing (and real!) in the photos, but how do they look up close? Do they look just as beautiful, or are they more crafty-looking?
Thanks!
hi from maldives =D
thanks alot for the neat tutorial,i hope its ok if i feature this one on my blog.
Hi Wendy!
THANKS for your tutorial. It's great!! And my little artists have created some roses in your honor ;-)
You can see them, if you want, in http://manualescanigo.blogspot.com/2009/04/las-rosas-de-sant-jordi.html
Cristina :)
hello, i found your photos in other blog but not with your name.
the link is this
http://only-one.myblog.it/archive/2009/04/28/10-maggio-2009.html#comments
your photos is very nice
violeta
Ooo, things like this make my day brighter. Looks like fun.
Hello, I've just found your blog via Stumbleupon, and I'd love to feature this tutorial on my blog, if that's OK? http://kittyballisticscreations.blogspot.com/
this is soooo hard to make, wendy, but you make it look so easy!!!
AWEsome! I love the finished look & your tutorial is a work of art in itself. Thanks so much for sharing this great project! :O)
These flowers are gorgeous! Thanks for the tutorial...great photography.
I'm happy to have discovered your blog from a paper crafting friend. Congrats on the pregnancy!
We live in the same area. I'm in Milpitas.
Wow, this is great!! I use "stumble!" and one of the things I said I liked was crafty stuff. I was bored and was "stumbling", and this site came up. I'm so excited to go out and try this now!! Thank you!!
wait a minute this can't be right! this is actually easy wow!
Oh I love it! thank you!
what a nice tutorial! :) i blogged about it ...
http://sewlola.blogspot.com/
Thanks for posting this!
Love it!
Simple but brilliant!!!
Thank you for this tutorial. Very clever and very effective ;)
hugs, moi
i relly like it!!!!!!!!
Hi wendy I'd love to pop your tutorial with full credit to you on a new blog I'm creating called sharing crafty ideas. Too often I see great ideas out there, try them for myself and can't remember who to give credit too! xx
woops sorry i meant a link to your tutorial!
These were incredibly easy to make. Thank you for the tutorial. My friend showed me this post when we were looking for ideas for my friend's bachelorette party. I'm currently working on a blog post over at http://heylovedc.tumblr.com and it will link back to here. :)
Awesome! Even my little ones can do this!
Hi Wendy, thanks for the tutorial, Awesome. Will visit your blog more often.
Nice post as for me. It would be great to read more about this theme. Thanks for posting that information.
Sexy Lady
A Level London Escorts
I like this....thanks!
X Maureen
simply fabulous! thanks for the tutorial!
This is so sweet, perfect for some Valentine's cards! Thank you for sharing :]
[arrived via a post on http://creaturecomforts.typepad.com/my_weblog/2008/06/tutorial-tuesda.html ]
Your tutorial has been used as a part of my "DIY flower week" ...thanks for the great step-by-step instructions!!
[http://skinniepiggie.blogspot.com/2010/01/paper-flowers-set-1.html]
These are so lovely! Thanks so much for sharing with everyone how to make them!
Corinna
www.myscrapbooklife.com
Oh my goodness, aren't those darling?! What a nice effect they make. Thank you.
oooooo i love these. If I end up making some I will post and link back. super cute
Thanks so much! Made it...linked it back to you...looooove it!
Thanks again,
M.L.
Super cool and easy...is there anything better?
Nice idea. Is there a way maybe to affix a green paper stem to it? i think it'd be pretty easy. I was thinking about making one for all my girl friends (I'm a guy) as something nice that doesnt seem like I'm saying "I LOVE YOU!" for valentines day.
brennan - what a sweet idea for your girl friends! i'm sure they'd like it! i've never tried affixing the flowers to a green paper stem before, but i'm sure it's do-able. good luck!
My girls and I have had some great fun making these. And the group of 3rd grade scouts I help lead loved how such a simple process could make such a "cool flower."
One small change I did on some of my roses was to cut a scallop along the swirl instead of just a straight line. (Photo of result here.)
Anyway, I'm so glad you posted this!! : )
AMAZING! This is exactly what I was looking for! Super easy and so cute. Look at the card I made for V day... http://brittanystiles.blogspot.com/2010/02/v-day-b-day.html
I wish I had come across this before Valentine's Day, but I've got some ideas for Easter. Thanks!
I have a picture that I got at Hobby Lobby years ago of red flower in a vase with blue, yellow and green background on an orange table... know the one? Anyways, love the picture and these flowers remind me of them. So, I'm making them to go next to my TV! Just need to go cut some branches and spray paint them brown. Thanks so much for the easy idea!
yum-o! I love them, thanks for sharing ;)
Hi Wendy,
These flowers are beautiful and seem so easy to make! I would love to show your tutorial to the teachers at my sons' daycare to make for Mother's Day presents.
Thanks for this great tutorial. I found a link on Christine's blog. I'm so glad she linked you....these are great flowers.
Thanks for sharing.
Kat x
Wendy, what a wonderful tutorial. How simple and yet how beautiful the roses are. Thanks for sharing. I will give this a try.
Hugs.
Norma
en verdad mil gracias he buscado como no se imagina este tipo de manualidades para enseñar a un grupo de adolescentes con los que trabajo.... ..no tengo muchas ideas pero usted me ha ayudado muchisimo gracias a Dios por usted................DIOS la bendiga grandemente.
excelente!! I was looking for something like that for a long time! thanks!!!!!!
Thank you so much for the tutorial,this paper flower is real cute and look so fun doing this. Keep posting!
vee
Wendy - I found your tutorial through Anita Rex who made your paper flowers for a card that got picked up on the Hero Arts blog. I had so much fun making these flowers - so easy and so elegant. I posted my version on my newbie blog. Thanks for posting this. I'll make these again and again.
Julie B.
Oh these are so pretty - I really can't wait to try them myself! Thanks so much for the tutorial.
lovely..lovely..can i post this tutorial in my blog?
Really Beautiful Blooms, I would love to add them to the new blog I'm creating - Handmade Flower Creations - if thats ok!?
http://handmadeflowercreations.blogspot.com/p/paper-flowers.html
Nicola and sibebo - certainly! as long as you link back :) thanks!
oh my! these are terrific!
i have been looking high and low for an easy and elegant paper flower! i am planning events to honor vets and we want make a personalized wreath to put on our neighborhood war memorial for Memorial day. so many paper flowers i have come across look cheesy or are so overly complicated they would be too hard to coordinate a large group to participate!!! thanks!
Wow, nice project, but most of all, nice photos! Really nice lighting and composition and what not. Like it.
What a pretty paper flower!
Hi Wendy!
I just tried your paper flower. It is so fun to make! I mentioned & link your paper flower tutorial in my blog.
http://justbettertogether.blogspot.com/2010/06/recyeled-folders-tissue-box.html
Justine
Hi!
Thanx a lot, I'm gonna use it for my scrapbooking :-)
This is so beautiful!
i love too see this..
Thank you for sharing this..
lovely :)
This is wonderful! I have been looking for closures for my handmade paper journals. I think these would work out great. thank you
Hi Wendy,
I came across this tutorial just today and I think it's lovely!
I hope you don't mind that I put a link on my blog to this tutorial :)
just love the roses on the branch display. I need to put together 16 centerpieces for my moms's 70th birthday party. How did you affix the roses to the branches?
thank you! i just strung them through the hole in the middle of the flowers, though you can probably glue them on as well. hope that helps!
Love this project! I made these in a matter of a couple of minutes. I love this project so much, I'm linking to it from my own blog, Green Earth Bazaar.
Love your blog. I'm happy to have discovered it, and am am totally subscribing to your feed now. Thanks again!
Peace. ;)
Michelle @ greenearthbazaar.com
Wendy, these are stunning but mine don't stay rolled up, even with tape.
Suggestions? Also, what thickness is the paper you use?
I'd like to use them as my and bridesmaids bouquets.
Thanks!
Bronwyn - make sure you roll them up as tightly as you can. It also helps to use thicker paper -- something around the thickness of construction paper should be good. Hope that helps!
Love this easy flower. Thanks.
Wow, I love this diy idea and so simple too! I can't wait to try this for a little decorating around my home. What a wonderful idea for decorating for various events as well.
wooooow its cool..... i tried this... thanx alot...!!!
Gorgeous flower!! I'd love to try it for my table :-)
Wonderful! TFS..
I love all the pictures you take and crafts you make. It's so cool that I live very close to you!(san jose) Thanks
Love this tutorial! Used it a while back and am now linking it to my blog http://feltedgypsy.blogspot.com/ :)
Thanks for the clear and simple tut.
Monica
What a nice paper flower tutorial I like it so much. Anyway,will certainly visit your site more often now.
toni
I love those paper red roses. If haven't seen how you do it, I'd thought this is hard to do. Thanks for posting the tutorial, so simple but fantastic. The vase looks cool, where did you get it? Thanks a lot for sharing. :)
Hi Wendy-
My name is Bethany Marcello, and I write for the yet-to-be-launched Craftfoxes.com - a crafting and social networking site.We're putting together some great stuff for our upcoming launch, featuring everything from quilting to sewing to crafting and baking.
One of our writers came across this picture of the roses on your site and was wondering if you would grant us permission to use it? We'd give you a link to your site.
Thanks for your consideration!
Bethany Marcello
http://craftfoxes.com
http://www.facebook.com/group.php?gid=15312551941#!/pages/CraftFoxes/153289901371436
http://twitter.com/craftfoxes
Hi Bethany, thanks so much for asking - yes, you may use the picture of the paper roses. Good luck with the launch!
Hey Wendy,
I have to thank you profusely for this. This little thing helped me win the heart of a very special someone!
Pranav - it makes me so happy to know that! Thanks for letting me know!
Thanks Wendy for your tutorial. We've done ours as a wedding gift to one of the staffs ;)
http://pe4rl.blogspot.com/2010/12/siap-akhirnya.html
Thank you for making it look so easy!
Hi Wendy.
Nice piece of work there.
Thanks for your sharing.
I am currently doing these roses for valentine's day, for my girl.
Do you mind if i share this on my blog?
If it is not, it is alright.
Still, thank you very much!! =]
it looks so simple try at first but the result is look so nice. i love red also. nice :)
Lovely, i went looking for this a while ago because the have packages of this but I did not like the colours and wanted to make my one so this weekend i'm gonna try
thank you for showing
I love these! I've made them many times using your tutorial. I've posted a photo of my flowers which I made from magazine pages and a link back to your tutorial on my blog here:
http://mytwobutterflies.blogspot.com/2011/02/because-my-fresh-flowers-keep-dying.html
Thanks for the awesome tutorial!!
I love this DIY paper flower - it's featured on my blog. Thanks for sharing this idea!
Thank you for such a beautiful and stylish crafting idea. I posted it on my FB page!
Hi Wendy!
Thanks for posting this tutorial, what a great idea! Would you mind if I shared this idea with others on my blog? Thanks! :)
http://luxuriouslyfine.blogspot.com
Thank`s for your tutorial! Your roses are brilliant!
Wow, the end result of this project is just fantastic, the vase is beautiful, so simple but very elegant, very creative. Thanks :)
looks so much better than the ones we used to do in kindergarten - and since nature has decided to wait a bit longer, i will just have to make these instead. thanks
I love this tutorial! So simple yet so elegant. I hope you don't mind but I shared your tutorial on my blog :)
http://www.deeindesign.com/blog/2011/03/paper-flowers/
Thank you so much for sharing this! I have been wanting to know how to make these! Thank you again!
Wow. I just love it! This inspired a great wedding favor! Thank you :)
These are so simple and so beautiful. I'll make some for Easter and Mother's Day. Added a link to this tute from Fabulous Easy Paper Crafts.
why isn't mine turning into a flower!!!
I love these. I'm going to share the idea with my daughter who is a teacher. Maybe she'll take the hint and make some for me. Thanks for sharing!
That is absolutely gorgeous and simple. I used to make easier ones but they were TOTALLY different and not as pretty. Also they didn't look real. It was just something I added to cards. Mine looked unrealistic and like kids artwork but this is realistic and professional. Also they can be used for decoration to look nice! LOVE IT!
Thanks for showing how to make these. They are so cute and I will definitely be using them!
actually, too, if you leave it as a square and make a "square spiral" rather than a circle, then you get pointed petals that stick up and look even more rose-like.
I had forgotten where I had first seen this technique, so when I happened upon this page again I had to give credit where credit is due. Inspired by this technique, I made a food version of this flower– crepe roses. Delicious and pretty. Thanks for the inspiration!
http://kitchentablescraps.com/stretch-and-savor/creperoses/
I realized the importance of wrapping from the OUTSIDE first... at first, my flowers failed because I wrapped from the inside.
Love this project, I'm using it to decorate my cottage!
thnkzz my mom will love them <3 <3 <3
Hey Lady! Just discovered your inspiring blog and had to follow along! I think I'll use this flower idea! Thanks so much for sharing!
Thanks for sharing! Can't wait to try to make my own!
I love these too!!!! They look great with recycled paper if you have half an old book lying around that you can`t stomach to throw away!
sweet flower
Very nice. I just finish practicing making some with my stack of "Post-It" notes :) Came out very cute. I ran across your site via Pinterest, which is a wonderful site!
Now I'm off to visit the rest of your blog!
Ma che belle queste rose, complimenti! Carmen
I found your blog via Pinterest! What a beautiful & easy to follow tutorial! I featured this pin as one of the inspiration pins for a Pinterest inspired baby shower here: http://www.pinfluence.com/2011/11/03/welcoming-baby-emma-pinterest-style/
I folded that rose and I'm gonna give it to a girl from school that I fell in love in. I'll give it to her and say "You dropped it." I'm so afraid.. Wish me luck :)
Your blog is super fun.. i love this tutorial of yours!! Check out mine and follow if you like pls :)
http://oopsitsvidya.blogspot.com/
Loved the tutorial!
Blogged about it and linked back to this post: http://thenovicehousewife.wordpress.com/2011/11/27/welcoming-a-baby-with-cake-and-other-great-ideas/
Thanks!
find out how we used your paper flower
http://www.justforthefamily.com/7/post/2011/11/chrismas-advent.html
Stunning!
I've always liked the look of this so I finally tried it after seeing your tutorial. I found the branches really cheap at Old Time Pottery for 2.99 but I guess I could've found them a lot cheaper outside in the yard! LOL. It turned out SO GOOD. My sister, who never likes the things I create, loved it and said she wants a bunch for her new house, different colors for different rooms.
Thanks for sharing, it's really nice from you, because this flowers are so cute ! I thought it was very difficult to do this but with you, it seems to be easy !
Oh wow I just made a crafty thing for the first time my life ! (and I'm nearly 44)
I've never been able to do this sort of thing. I'm the total cookoo in the nest of a very crafty family.
Admittedly due to the "practice" materials I'm using while I get the hang of it, I have ended up with a pale blue rose on a red twig....but it is beautiful (to me) cos I can see how with few more run throughs I'll get to the point where I can make something approaching the finished project.
I am so chuffed I could pop!
You are hereby my fave Pinterest pin on the whole site.
merci ♥♥♥
Found your tutorial on Pinterest. I just love this.
What a simple, but perfect idea! Can`t wait to do it by myself. I`ll post it on my blog.
http://theproject6x6.blogspot.com/
http://creactiveallaround.blogspot.com/
Merci!
Where does one find the fake branches for this project? I don't have access to any real branches that would be small/pretty enough...
Hi Tyler - I found the branches at Michael's.
Hey I really love your post :) I'm doing it for my mom :) I'm just wondering if it's possible to put a paper stem? I'm making it into a bunch of flowers... thanks :)
Fabulous tutorial! We featured it here: http://blog.mixbook.com/5-kid-friendly-diy-tricks-for-hosting-a-home-spa-for-mothers-day/
Hi - I'm sure it's possible to attach the flowers to a paper stem though I've never done it myself. Good luck!
I've posted a link to your directions from http://diyweddingplanning.blogspot.com. I love these! So easy! And for a mother planning a Valentine's weekend wedding next year these are a life-saver! Also recommended my brides come visit your site.
I did these for my mom for mothers day and she just adored them! Thank you so much:)
My goodness it I am in charge of kids crafts for World Breastfeeding Week (August 1-7, 2012) at the First Friday celebration on our city. I needed a quick, easy "something." These roses are IT. Thank you, thank you, thank you. I had a bunch of tracheostomy ties in blue with white stars on them. We will use them as the band, make a paper rose (just the size you recommend here) and stick the rose to the band with a 1-3/4 inch steel paper fastener. It makes an awesome bracelet. I can't wait till the Lycoming-Clinton Breastfeeding coalition meeting tomorrow. I am going to hand every member a 4x4 piece of red paper and pair of scissors. Everyone is going to make one!
Thanks for sharing your awesome ideas!
Dawn
Thank you for the tutorial. I have found you can use scalloped scissors too.
Thank you, I have been looking for a simple but effective paper flower for my pupils to make for my wedding bouquet. i love these!
this is gorgeous, i had a go at making one flower, just to see if i could and i love it, thanks for sharing, pictures here http://abimakes.blogspot.co.uk/2012/08/paper-flowers-and-3d-star-try-outs.html
Thank you for this article. I needed to make some flowers for a school project but most of the ones I found were too complicated. I also found that spraying the rose with hairspray helps it hold better.
C'est tros beau!!!!!!
Love this craft and so easy to make . Fabulous !
Wow! So easy and so helpful! Just used your flower tutorial to make a heart wreath for Valentine's Day! Check it out! http://eatsleepcrafts.blogspot.com/2013/01/valentines-paper-flower-heart-wreath.html
This has helped with my college assignment~! thanks!
I love this so I featured it in my blog post on FaveCrafts. You can see the post here: http://www.favecraftsblog.com/lasting-love-paper-flowers-crafts-for-kids-to-make-other-flower-crafts/. Feel free to share it with your readers!
Best,
Jaclyn
wow easy never new i think i can make a big one if i try :) love it and do u think u can make a paper gift bag :)
I am in love with these flowers... and this tutorial shows to start rolling from the outside (not inside - which is where I was wrong when first trying!)
However, I have a question... mine always end up looking more like a circle with a spiral inside than a rose.. is there a trick to rolling it so that it is shaped more like a rose? Should I be rolling up, down, or right along the paper? Also, when cutting, should the spiral be the same thickness all the way around, or thicker at one end?
Hi Allie - I would say just roll right along the paper, maybe try to keep the inside edge (what would be the bottom of the flower) somewhat lined up as you roll, and also try to keep the roll tight as you're going along. The thickness of the spiral shouldn't matter too much but I would try to keep the thickness more consistent. Hope that helps! Good luck :)
Hi, I've seen paper flowers before but didn't know how to make them. Thanks so much for this tutorial ... now I'll have to try it.
Post a Comment